
Carnivore Fried Chicken Thighs: The KFC Dupe That’ll Make You Forget Seed Oils Exist
#CarnivoreDiet #CarnivoreRecipes #FriedChicken #AnimalBased #ZeroCarb #CarnivoreChicken #MeatDiet #AncestralDiet #ProperHumanDiet #CarnivoreLifestyle
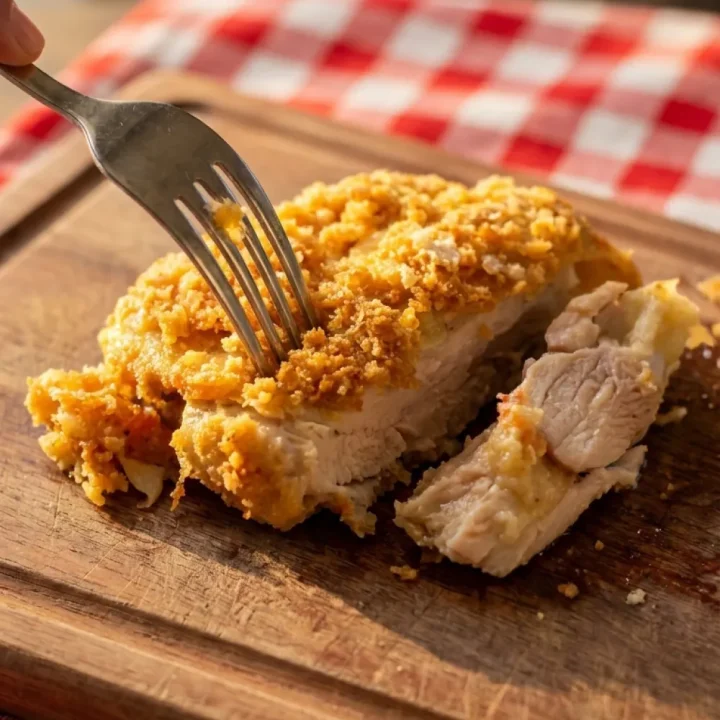
Picture this… you’re sitting across from a plate of golden, shatteringly crispy fried chicken. The crunch is audible. The juice literally runs when you break into it. And the entire ingredient list? Chicken thighs, pork rinds, egg white, Parmesan, beef gelatin, and salt. That’s it. No flour. No seed oils. No mystery powder number seven. 🍗
If you’ve been on the carnivore diet — or are seriously thinking about it — and you’ve been quietly mourning your Friday night KFC habit, I have genuinely good news for you. These carnivore fried chicken thighs are not a consolation prize. They are the real deal, and in some ways? They actually beat the original.
I’ve spent over 30 years in the health and fitness world, and I’ve seen a lot of “healthy fried chicken” recipes that taste like cardboard wearing a costume. This one is different. The secret weapon is beef gelatin — and once you understand why it works, you’ll never skip it again.
This recipe is perfect for the carnivore, zero carb, primal, and ancestral diet crowd. It works brilliantly as a lunch or dinner, and yes — it’s just as good cold from the fridge the next day. Ask me how I know… 😄
Suitable for: Carnivore diet, zero carb diet, no carb diet, animal-based diet, primal diet, Atkins diet, keto diet
Meal type: Lunch, dinner
#CarnivoreDiet #FriedChicken #ZeroCarb #CarnivoreChicken #AnimalBased #MeatDiet #ProperHumanDiet #AncestralDiet #NoCarbRecipes #HighProteinMeals
- 1. Quick Stats 📊
- 2. What You'll Need in the Kitchen 🍳
- 3. Ingredients 🛒
- 4. Step-by-Step Instructions 👨🍳
- 5. Serving & Presentation 🍽️
- 6. How to Store These Beauties 🧊
- 7. Why This Recipe Actually Works 💡
- 8. Common Mistakes to Avoid ⚠️
- 9. Alternatives & Substitutions 🔄
- 10. FAQ 🙋♀️
- 11. Final Thoughts 🍗
- 12. More Recipes to Try Next 🍽️

Quick Stats 📊
- Prep time: 10 minutes
- Cook time: 60 minutes
- Total time: 70 minutes
- Servings: 2
- Calories: ~520 per serving
- Protein: ~48g | Fat: ~35g | Net Carbs: ~1g
- Difficulty: Easy 🟢
What You’ll Need in the Kitchen 🍳
You don’t need anything fancy here, which I genuinely appreciate after years of recipe testing with absurd equipment lists.
- Oven (a countertop convection oven works great too)
- Wire rack placed on a baking sheet — this is key for all-round crispiness
- Small blender or food processor (to grind pork rinds — a zip-lock bag and rolling pin also works)
- Two shallow bowls for your egg wash and coating
- Tongs for handling the chicken cleanly
Ingredients 🛒
Protein 🍗
- 2 large bone-in, skin-on chicken thighs
Coating 🧀
- 1 cup 🐷 pork rinds, finely ground
- 1.5 tablespoons Parmesan cheese, finely grated
- 1 scoop (~1 tablespoon) unflavored beef gelatin (Vital Proteins grass-fed is a solid choice)
- Salt to taste (applied in two stages — see instructions)
Egg Wash 🥚
- 1 large egg white (you can use a whole egg if that’s all you have)
Step-by-Step Instructions 👨🍳
Step 1: Preheat and Prepare Your Station
Preheat your oven to 350°F (175°C). Set a wire rack inside a rimmed baking sheet and set it aside. The rack is non-negotiable here — airflow underneath the chicken is what gives you that all-round crunch.
Step 2: Grind Your Pork Rinds
Add your pork rinds to a small blender or food processor and pulse until you get a fine, breadcrumb-like texture. Don’t go too fine — a little texture in there is your friend. 🐷
If you don’t have a blender, seal the pork rinds in a zip-lock bag and go at them with a rolling pin. It’s oddly satisfying, TBH.
Step 3: Mix Your Coating
In a shallow bowl, combine your ground pork rinds and grated Parmesan. Mix them together until evenly distributed.
Important: Do NOT add the beef gelatin to this dry mix. It goes directly onto the chicken in the next step. This distinction matters — trust the process. 💪
Step 4: Coat the Chicken in Beef Gelatin
Here’s the secret step that most people skip — and the one that makes all the difference on a carnivore or zero carb diet where traditional flour coatings are off the table.
Take your beef gelatin scoop and get it all over the chicken thighs — really press it in and cover every surface. The gelatin acts like a binder and creates an almost lacquered surface when it bakes, which is what produces that extraordinary crunch. Don’t be shy with it. Get it everywhere.
Pro tip: Add a pinch of salt at this stage directly onto the gelatin-coated chicken before you dip it in the coating.
Step 5: Egg Wash
Beat your egg white lightly in a shallow bowl. Dip each gelatin-coated chicken thigh into the egg white, letting any excess drip off. The egg white helps the pork rind coating stick properly.
Step 6: Apply the Coating
Press each chicken thigh firmly into the pork rind and Parmesan mixture. Press — don’t just dip. You want a good, thick crust on there. Get every surface coated. 🧀
Don’t waste any leftover coating crumbles — press them directly onto the top of the chicken once it’s on the rack. Every crunch counts.
Step 7: Season and Rack It
Place coated chicken thighs skin-side up on your wire rack. Add a final pinch of salt on top. That second hit of salt on the exterior of the coating really elevates the flavour.
Step 8: Bake for a Full Hour
Place the rack in the oven and bake at 350°F for 60 full minutes. Don’t rush this. Don’t check it every ten minutes. Don’t bump the temperature up. One hour at 350 is what gives you juicy interior and genuinely crispy exterior at the same time.
Set a timer, take the dogs for a walk, do whatever you need to do… and come back to something magical. 🙌
Step 9: Rest Before Serving
Let the chicken rest for 3–5 minutes after removing from the oven. This lets the juices redistribute so every bite stays juicy rather than flooding the plate.
Batch Cooking Tips 🗓️
Scaling this up is simple — just multiply every ingredient proportionally. Use a larger baking sheet with two racks if needed. Don’t crowd the chicken — spacing is critical for airflow and crunch. These thighs store beautifully (see storage section), so making 4–6 at a time for the week is a genuinely smart move.

Serving & Presentation 🍽️
Plating Like a Pro
Place your chicken thigh on a clean white plate or wooden board, crunch-side up. The golden-brown crust does all the visual work here — it genuinely looks restaurant-quality.
Flavour Enhancers
- A dipping bowl of carnivore mayonnaise alongside is a perfect pairing
- A drizzle of carnivore butter melted over the top takes this to another level
- A sprinkle of flaky sea salt right before serving? Chef’s kiss 🧂
Complementary Recipes
- Carnivore Chicken and Dumplings — for when you want to stretch that chicken theme into something hearty and warming
- Carnivore Mashed Potatoes — yes, they exist, and they pair unbelievably well here
- Carnivore Gravy — pour it over and prepare to feel very smug about your life choices 😄
Occasion Recommendations
This is a brilliant weeknight dinner that feels special without being complicated. It also works perfectly for meal prep Sundays since it reheats and even serves cold beautifully.
How to Store These Beauties 🧊
Container Recommendations
Store cooled chicken thighs in an airtight glass container in the refrigerator. Glass is genuinely better here — it doesn’t trap moisture the way plastic can, which helps preserve that crust.
They keep well in the fridge for up to 4 days.
Reheating
- Oven (best method): 325°F for 10–12 minutes on a wire rack. The crust revives beautifully.
- Air fryer (fastest): 350°F for 5–6 minutes. Comes out almost as good as fresh.
- Microwave: Works fine for a quick reheat, though you’ll sacrifice some crunch.
Cold Straight from the Fridge?
Honestly… yes. Cold carnivore fried chicken thighs straight from the fridge are legitimately delicious — similar to cold KFC, except without the 30+ questionable ingredients. It stayed crunchy in a glass container overnight, which says everything about how well this coating holds up.
On-the-Go
Pack in a glass container with a tight-fitting lid. Great for office lunches or post-workout meals on the meat diet or ancestral diet lifestyle.
Why This Recipe Actually Works 💡
The Beef Gelatin Secret
This is the ingredient that separates a good carnivore fried chicken from a great one. Beef gelatin — especially a quality grass-fed version — creates a crispy, almost lacquered coating when exposed to oven heat. It also adds collagen to your meal, which supports joint health, skin elasticity, and gut lining integrity. FYI — that’s a serious nutritional bonus hiding inside what feels like a treat meal.
Nutritional Wins
- Chicken thighs are rich in selenium, phosphorus, zinc, and B vitamins — especially B3 and B6, which support energy metabolism
- Pork rinds provide pure protein and fat with zero carbohydrates — perfect for a zero carb or no carb diet
- Parmesan contributes calcium and adds real depth of flavour
- Egg white provides lean protein and acts as a natural binder
The Bigger Picture
The carnivore diet — sometimes called the proper human diet, primal diet, or animal diet — strips out processed foods, seed oils, refined flour, and additives entirely. Traditional fried chicken from fast food chains contains seed oil-fried batter with dozens of ingredients, many of which drive inflammation. This version eliminates all of that.
High protein. Zero carbs. No seed oils. No gluten. No sugar. If you’ve been counting calories and feeling hungry all the time, the satiety you’ll feel from a meal like this will genuinely surprise you. Two chicken thighs and you’re done — no cravings, no afternoon slump, no reaching for something sweet an hour later.
Craving more chicken inspiration? Check out carnivore fried chicken tenders or carnivore chicken poppers for more crispy, coating-based carnivore wins.
Common Mistakes to Avoid ⚠️
🐷 Skipping the beef gelatin — This is the one non-negotiable. Without it, your coating won’t achieve that signature crunch. It’s the whole game.
🥚 Using the whole egg instead of just the white — The yolk adds extra fat that can make the coating slide off rather than stick cleanly. Egg white only for the wash.
🍗 Not pressing the coating firmly — Dipping gently doesn’t cut it. Press the chicken thigh into the coating with real intention. You want maximum surface contact.
🌡️ Bumping the temperature to cook faster — 350°F for the full hour is the formula. Higher heat risks burning the pork rind coating before the interior cooks through.
🧂 Only salting once — The two-stage salting process (on the gelatin layer AND on top of the finished coating) genuinely elevates the flavour. Don’t skip stage two.
🍳 Skipping the wire rack — Placing chicken directly on a flat baking sheet creates a steamed, soggy underside. The rack ensures hot air circulates all around.
🐄 Overcrowding the pan — If the thighs are touching, they’ll steam each other. Space them out. Airflow is everything in this recipe.
Alternatives & Substitutions 🔄
Different Cuts
This coating works on drumsticks, chicken wings, or bone-in breasts too — just adjust cooking time accordingly. Wings will be done in about 40–45 minutes. Check out carnivore chicken wings for a dedicated wing recipe.
Dairy-Free Option
Simply omit the Parmesan. The pork rind and gelatin combination still produces a great crust — you’ll just get a slightly less complex flavour. Works perfectly for a stricter lion diet or zero carb approach.
Spice It Up
The original recipe uses salt only, which is beautifully clean. But if you’re on a slightly more relaxed primal diet or Atkins diet approach, adding smoked paprika, garlic powder, or onion powder to the coating takes this in a new direction. Go sparingly — you still want to taste the chicken.
Budget Swap
Parmesan can be replaced with any hard, finely grated cheese — Pecorino Romano, aged Cheddar, or even basic pre-grated Italian blend from the supermarket all work. The gelatin is worth buying properly though — don’t skip or substitute it.
Health Goal Adjustments
- Higher fat intake: Use bone-in, skin-on thighs and don’t trim any fat before coating
- Higher protein focus: Use skinless thighs and reduce pork rind quantity slightly
- Strict carnivore / lion diet: Omit Parmesan and use salt only
FAQ 🙋♀️
Q: Can I use a whole egg instead of just egg white?
A: You can, but egg white works better as a binder for this coating. The yolk adds fat that can cause the pork rind coating to slip rather than adhere. If a whole egg is all you have, it’ll still work — just press the coating on more firmly.
Q: Can I make this in an air fryer?
A: Yes! Air fry at 375°F for about 25–30 minutes, flipping halfway. The result is excellent — just slightly less even than the full oven bake. For dedicated air fryer chicken, carnivore air fryer chicken has you covered.
Q: Where do I find unflavored beef gelatin?
A: Most health food stores carry it, and it’s widely available online. Vital Proteins grass-fed gelatin is a popular choice and what was used in the original recipe. Make sure it’s unflavored — the flavored collagen peptides won’t work the same way here.
Q: Does this recipe work for strict carnivore / lion diet?
A: Yes — with minor adjustments. Omit the Parmesan and you’re left with chicken, pork rinds, egg white, beef gelatin, and salt. That’s as clean as it gets on a strict animal diet or lion diet protocol.
Q: Is this recipe suitable for someone just starting carnivore?
A: Absolutely — and IMO it’s a brilliant entry-point recipe. If you’ve been eating the standard American diet and you’re nervous about giving up comfort foods, this carnivore fried chicken proves right away that you don’t have to sacrifice satisfaction or texture. It’s genuinely delicious from day one.
Q: Can I prep the chicken ahead and coat it later?
A: Yes. You can apply the gelatin coat and refrigerate the chicken for up to 24 hours before doing the egg wash and pork rind coating. Just bring it to room temperature for 10–15 minutes before baking.
This website may contain affiliate links, which means that if you click on one of the product links, the website may receive a small commission at no extra charge to you!
Final Thoughts 🍗
Here’s the thing… carnivore fried chicken thighs shouldn’t be this good. There are only five real ingredients, no complicated technique, and no deep fryer involved. Yet somehow the result is juicy, crispy, genuinely satisfying fried chicken that holds up cold in the fridge and rehashes beautifully the next day.
For anyone used to calorie counting on the standard American diet, the freedom of eating something this delicious — and this filling — without counting a thing is a revelation. The zero carb, high protein, no seed oil format means your body is running on clean fuel, not crashing two hours later.
Whether you call it a carnivore diet, ancestral diet, primal diet, or proper human diet — this recipe belongs in your regular rotation. 🙌🍗🔥
For more carnivore cooking inspiration, check out the full carnivore diet recipes collection.
More Recipes to Try Next 🍽️
- Carnivore Fried Chicken Tenders — same crispy concept, different cut
- Carnivore Chicken Parmesan — takes the Parmesan idea somewhere spectacular
- Carnivore Country Fried Steak — same coating technique, total flavour shift
- Carnivore Chicken Casserole — when you want comfort food without the effort
carnivore fried chicken thighs
Incredibly crispy, juicy carnivore fried chicken thighs coated in ground pork rinds, Parmesan, and the secret weapon — beef gelatin — then baked at 350°F for a full hour. No seed oils, no flour, no mystery ingredients. Just clean, satisfying, KFC-dupe perfection that works for carnivore, zero carb, primal, and animal-based diets.
Ingredients
- 2 large bone-in, skin-on chicken thighs
- 1 cup pork rinds, finely ground
- 1.5 tablespoons Parmesan cheese, finely grated
- 1 scoop (approximately 1 tablespoon) unflavored beef gelatin
- 1 large egg white
- Salt to taste
Instructions
- Preheat the oven: Set your oven to 350°F (175°C). Place a wire rack on a rimmed baking sheet and set aside.
- Grind the pork rinds: Add pork rinds to a blender or food processor and pulse until you reach a fine, breadcrumb-like texture. Transfer to a shallow bowl and mix in the grated Parmesan cheese.
- Apply the beef gelatin: Sprinkle beef gelatin generously over all surfaces of the chicken thighs, pressing it firmly into the skin and meat. Add a pinch of salt at this stage directly onto the gelatin-coated chicken.
- Prepare the egg wash: Lightly beat the egg white in a shallow bowl. Dip each gelatin-coated chicken thigh into the egg white, allowing any excess to drip off.
- Coat the chicken: Press each thigh firmly into the pork rind and Parmesan mixture, ensuring full coverage on all surfaces. Transfer to the wire rack and press any remaining coating crumbles onto the top of each piece.
- Season and bake: Add a final pinch of salt on top of the coating. Place in the preheated oven and bake for 60 full minutes without opening the oven door.
- Rest and serve: Remove from oven and rest for 3–5 minutes before serving. Serve with carnivore mayonnaise or carnivore gravy if desired.
Notes
Do not skip the beef gelatin — it is the key ingredient that produces the crispy, lacquered coating. Use only egg white (not whole egg) for the wash to ensure maximum coating adhesion. Always use a wire rack for baking to allow hot air to circulate underneath the chicken. Do not increase the oven temperature — 350°F for the full 60 minutes is the correct formula. Leftovers store well in a glass container in the fridge for up to 4 days and are excellent cold.
Nutrition Information
Yield 2 Serving Size 1 chicken thighAmount Per Serving Calories 520Total Fat 35gSaturated Fat 10gTrans Fat 0gUnsaturated Fat 22gCholesterol 175mgSodium 620mgCarbohydrates 1gNet Carbohydrates 1gFiber 0gSugar 0gProtein 48g