
Carnivore Whipped Cream Clouds: A Dreamy Dessert for Your Animal-Based Diet
Imagine biting into a cloud of frozen whipped cream that melts slowly on your tongue, leaving behind nothing but pure, creamy bliss… That’s exactly what these Carnivore Whipped Cream Clouds deliver! I’ve been making these fluffy little treats for years, and they’ve saved me countless times when sugar cravings hit. The best part? They’re ridiculously simple to make with just heavy cream as the star ingredient. These frozen cream treats are the perfect guilt-free indulgence for anyone following an animal-based diet who still wants something sweet and satisfying. 🍦🥛🍨
#carnivorewhippedcream #heavycreamsnack #zerocarbtreats #frozendessert #carbfreesnacks #animalbaseddiet #dairysnacks #carnivorelifestyle #creamclouds #carnivoresweets
The most beautiful thing about these clouds is how versatile they are—perfect as a standalone treat, delightful when floated on hot coffee, or magnificent as a topping for other carnivore desserts. Whether you’re strictly carnivore, keto, or just looking for a cleaner treat without processed sugar, these cream clouds will become your new favorite snack!

Quick Stats
- Prep Time: 15 minutes
- Freeze Time: 1-2 hours
- Total Time: 2 hours 15 minutes
- Servings: 12-15 clouds
- Calories: 70 per cloud
- Macros: 7g fat, 0.6g carbs, 0.4g protein per cloud
- Difficulty: Easy
What You’ll Need
- Small baking sheet/tray (must fit in your freezer!)
- Parchment paper
- Electric mixer with beaters (a stand mixer works great, but hand mixers are perfect too)
- Large mixing bowl (stainless steel preferred)
- Spoon or piping bag
- Optional: Ziplock bags as DIY piping bags
Pro tip: Don’t have a piping bag? Do what I do—grab a ziplock bag, snip off one corner, and voilà! Instant piping tool. Trust me, after 30+ years in health and fitness, I’ve learned to improvise in the kitchen.
Ingredients
Base Ingredient
- 1 cup heavy cream/double cream/whipping cream (cold from the refrigerator)
Optional Add-ins (For Flexible Carnivore)
- Sweeteners:
- 1 tablespoon honey
- OR 1-2 teaspoons powdered monk fruit
- OR a few drops of liquid stevia
- Flavorings:
- 1 teaspoon
vanilla extract - OR 1-2 teaspoons 100% cocoa powder
- OR 1/2 teaspoon cinnamon
- OR 1/2 teaspoon almond extract
- For Garnishing (Non-Strict Carnivore):
- Chocolate shavings
- Fresh berries
- Chopped nuts
- Food coloring (seasonal variations)
Let’s Make Some Clouds!
- Prep Your Tools: First things first—grab your stainless steel mixing bowl and beaters and pop them in the freezer for 10 minutes. This seemingly small step makes a HUGE difference! Cold tools help the cream whip up faster and hold its shape better because the fat in the cream stays nicely solidified. I learned this trick years ago when making cream for my Irish coffee, and it’s never failed me.
- Set Up Your Landing Pad: While your tools are chilling out in the freezer, line your small baking sheet with parchment paper. Make sure your tray will fit in your freezer before you start piping your clouds! (I’ve made this rookie mistake more than once… nothing worse than beautifully piped cream with nowhere cold to go!)
- Double-Check Freezer Space: Before going further, open your freezer and ensure there’s enough flat space for your tray. Rearrange if necessary—these clouds need their space!
- Get Whipping: Remove your chilled bowl and beaters from the freezer. Pour the COLD heavy cream into your chilled bowl. Cold cream + cold bowl = whipping magic!
- Begin Beating: Start your mixer on medium speed and beat the cream until it begins to thicken slightly, about 1-2 minutes. The cream will start to leave trails in the bowl.
- Add Optional Ingredients: If you’re not going strictly carnivore and want to add sweetener or flavoring, now’s the time! Add your chosen sweetener and/or extract and continue beating.
- The Perfect Peaks: Continue beating for another 2-3 minutes until soft peaks form. How do you know you’ve hit the sweet spot? Lift your beater—the cream should form a peak that gently curls over at the tip. If it stands straight up, you’ve gone too far. If it’s still soupy, keep going.
- STOP! Don’t Overbeat: This is crucial—there’s a fine line between whipped cream and butter! Stop as soon as you reach soft peaks. The cream should look fluffy and hold its shape but still have a slight glossy appearance.
- Shape Your Clouds: Now for the fun part! Using a spoon or your DIY piping bag, create little cloud shapes on your parchment-lined tray. If using a spoon, scoop up some whipped cream and drop it onto the parchment, then use the back of the spoon to create a swirl or peak on top.
- Piping Bag Method: If you’re feeling fancy, fill your piping bag (or that clever ziplock with the corner snipped off) with the whipped cream. Pipe swirled mounds about 2-3 inches in diameter onto the parchment paper. Apply gentle pressure for consistent clouds.
- Add Garnishes (Optional)
- If you want to add any garnishes, sprinkle them on now. A light dusting of cocoa powder creates a lovely visual effect and adds a hint of flavor without significantly increasing carbs.
- Freeze Those Fluffy Beauties: Carefully place your tray in the freezer, ensuring it stays flat. Freeze for 1-2 hours until the clouds are firm to the touch.
- Storage Prep: Once frozen solid, you can transfer the clouds to a sealed container or freezer bag for longer storage. Separate layers with parchment paper to prevent sticking.
- Batch Cooking Tip: These clouds freeze beautifully, so don’t hesitate to double or triple the recipe! Having a stash of these in your freezer means you’re always prepared when sweet cravings hit. One batch lasts me about a week of afternoon treats—that is, if I can resist having more than one a day!

Serving & Presentation
These versatile little clouds can be enjoyed in so many ways! My absolute favorite is dropping one into a hot cup of coffee or espresso. The cloud slowly melts, creating the most luxurious, creamy coffee experience imaginable—way better than those sugar-laden coffee shop drinks.
For an elegant dessert presentation, place a cloud on a small plate with a drizzle of Carnivore Caramel Sauce around it. The contrast between the frozen cloud and warm sauce creates a delightful temperature play.
They also pair wonderfully with Carnivore Brownies or Carnivore Cheesecake for an extra special treat.
For a breakfast indulgence, try floating a cloud on Carnivore Hot Chocolate or placing one alongside Carnivore Waffles.
These clouds are perfect for dinner parties, holiday gatherings, or any time you want to impress guests with a unique dessert that accommodates specialized diets.
How to Store Your Creamy Creations
Once your clouds are completely frozen, transfer them to an airtight container or freezer bag. I like to separate layers with parchment paper to prevent them from sticking together.
These will keep well in the freezer for up to 2 weeks, though honestly, they never last that long in my house!
For the best texture, let them sit at room temperature for about 1-2 minutes before eating. This allows the exterior to soften slightly while the interior remains frozen, creating that perfect melt-in-your-mouth experience.
For on-the-go options, you can place individual clouds in small silicone cupcake liners before freezing, then transfer the frozen clouds (still in their liners) to a container. This makes them easy to grab for a quick treat or pack in a cooler for a picnic dessert.
Benefits/Why This Recipe Works
These Carnivore Whipped Cream Clouds are a game-changer for anyone following an animal-based diet who misses having something sweet and satisfying. The high fat content makes them incredibly satiating, so you’re less likely to overindulge.
From a nutritional standpoint, heavy cream is an excellent source of fat-soluble vitamins A, D, E, and K, plus it contains conjugated linoleic acid (CLA), which has been linked to various health benefits including improved body composition.
What makes this recipe work so brilliantly is the science behind freezing whipped cream. When cream is whipped, tiny air bubbles get trapped in the fat network. Freezing then stabilizes these bubbles, creating that unique, melt-in-your-mouth texture that’s neither ice cream nor frozen cream, but something magically in between.
The carnivore diet itself promotes stable blood sugar, reduced inflammation, and improved digestion for many people. These clouds support those benefits by providing a treat that won’t spike insulin or trigger cravings like conventional sugar-laden desserts.
I’ve noticed in my 30+ years in health and fitness that having simple, satisfying treats like these available makes sticking to a specialized diet much more sustainable long-term. It’s not about deprivation—it’s about finding delicious alternatives that work with your body, not against it.
Common Mistakes to Avoid 🚫
Using Warm Equipment
Never skip chilling your bowl and beaters! Room temperature equipment will make it much harder to achieve those perfect soft peaks. I once tried to rush the process and ended up with a soupy mess that wouldn’t set properly. Learn from my mistakes! 🧊
Overbeating the Cream
There’s a fine line between whipped cream and butter. If you whip too long, the fat molecules will stick together, forcing out the liquid, and you’ll end up with sweet butter (which is delicious, but not what we’re going for here!). Stop when you reach soft peaks. 🥄
Using Ultra-Pasteurized Cream
If possible, choose cream that’s not ultra-pasteurized. Ultra-pasteurized cream doesn’t whip as well because the high heat processing damages the fat molecules. Regular pasteurized cream will give you fluffier, more stable clouds. 🐄
Crowding in the Freezer
Make sure your clouds have room to freeze properly. If they’re touching other items or squished, they’ll lose their beautiful shape. 🧊
Adding Liquid Flavors Too Quickly
If you’re using extracts, add them slowly and beat well between additions. Adding too much liquid at once can deflate your whipped cream. 💧
Alternatives/Substitutions
Heavy Cream Alternatives:
- Mascarpone cheese (whipped) creates an even richer cloud with a slight tang
- A 50/50 blend of whipped butter and heavy cream for an ultra-rich version
- Carnivore Clotted Cream can be whipped and frozen for a more decadent variation
For Strict Carnivores:
Stick with plain heavy cream without any additives or flavorings. The pure cream flavor is absolutely delightful on its own!
Budget Options:
- Watch for sales on heavy cream and freeze multiple batches at once
- Use the leftover cream from making butter (it whips beautifully!)
Adjustments for Health Goals:
- Higher Protein: Add a tablespoon of unflavored whey isolate to the cream before whipping
- Lower Calories: Use a mixture of whipped egg whites and cream (2:1 ratio)
- Higher Fat: Add a tablespoon of melted (then slightly cooled) butter to the cream before whipping
Seasonal Variations:
- Winter: Add a tiny pinch of Carnivore Pumpkin Spice flavoring
- Summer: Try a coffee-flavored version by adding a teaspoon of very strong, cooled espresso
FAQs
Q: Can I use a food processor instead of a mixer?
A: Not recommended. Food processors tend to incorporate less air and can overheat the cream quickly. Stick with a hand or stand mixer for best results.
Q: My cream isn’t whipping up properly. What am I doing wrong?
A: First, check if everything is cold enough—both the cream and your equipment. Second, ensure your cream has enough fat content (at least 30%). Low-fat creams won’t whip well. Finally, some ultra-pasteurized creams don’t whip as efficiently.
Q: Can I add protein powder to these?
A: Yes, but add it before you start whipping and use unflavored or minimally flavored varieties. Too much powder can affect the texture.
Q: How can I tell if I’ve overwhipped the cream?
A: Overwhipped cream loses its smooth, glossy appearance and starts looking grainy or curdled. If this happens, you can sometimes rescue it by gently folding in a bit more liquid heavy cream.
Q: Are these suitable for children?
A: Absolutely! Kids love these frozen treats, and they’re a great way to introduce higher fat, lower sugar options to little ones.
Q: Can I use these as a hot drink topper?
A: Yes! One of my favorite ways to enjoy these clouds is floating on hot coffee or Carnivore Hot Chocolate. The cloud slowly melts into the drink, creating a creamy, luxurious experience.
This website may contain affiliate links, which means that if you click on one of the product links, the website may receive a small commission at no extra charge to you!
Final Thoughts
These Carnivore Whipped Cream Clouds have been my secret weapon for staying consistent with an animal-based lifestyle without feeling deprived. There’s something magical about transforming a simple ingredient like heavy cream into a light, airy, frozen treat that satisfies both the palate and the soul.
What I love most about this recipe is how it proves that carnivore desserts can be both simple and spectacular. No need for complicated ingredients or hours in the kitchen—just good quality cream, properly whipped and frozen, creates something truly special.
Remember, the key to success with these clouds lies in the temperature and timing. Keep everything cold and don’t overwhip! With this technique mastered, you’ll have a go-to treat that supports your health goals while still feeling indulgent. Now that’s what I call having your cream cloud and eating it too! 🍦
More Dreamy Carnivore Treats to Try
- Carnivore Ice Cream – A richer frozen treat for serious indulgence
- Carnivore Custard – Silky, creamy comfort in every spoonful
- Carnivore Coffee Mousse Dessert – For the coffee lovers
- Carnivore Cheesecake Fluff – Another cloud-like dessert with a tangy twist
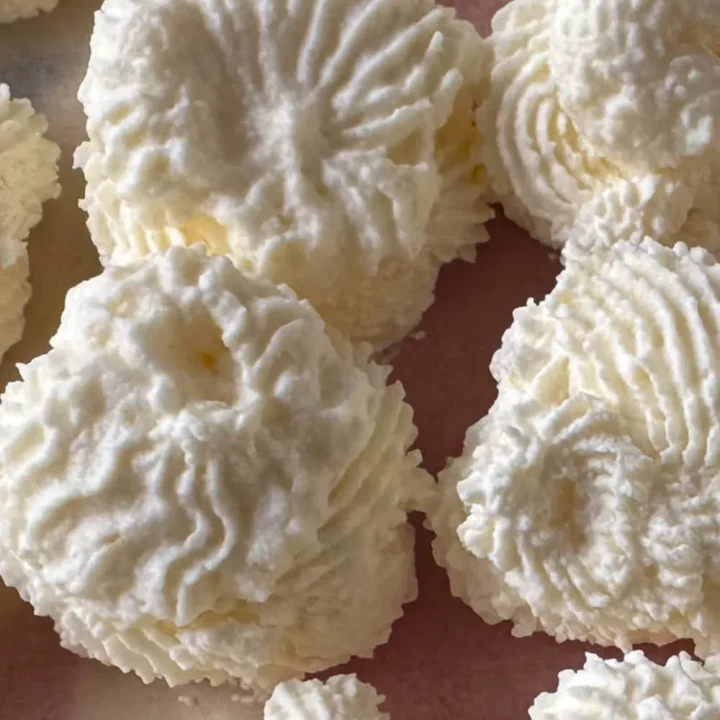
carnivore whipped cream clouds
Light and fluffy frozen whipped cream clouds that make the perfect carnivore-friendly treat. These versatile clouds can be enjoyed on their own as a snack, used to top hot drinks, or served alongside other carnivore desserts.
Ingredients
- 1 cup heavy cream/double cream/whipping cream (cold from the refrigerator)
- 1 tablespoon honey (optional, for flexible carnivore)
- 1 teaspoon vanilla extract (optional, for flexible carnivore)
- 1-2 teaspoons 100% cocoa powder (optional, for flexible carnivore)
Instructions
- Prep Your Tools: Place mixing bowl and beaters in the freezer for 10 minutes.
- Set Up Your Landing Pad: Line a small baking sheet with parchment paper.
- Double-Check Freezer Space: Ensure there's enough flat space in your freezer for the tray.
- Get Whipping: Remove chilled bowl and beaters. Pour cold heavy cream into the bowl.
- Begin Beating: Beat cream on medium speed until it begins to thicken, about 1-2 minutes.
- Add Optional Ingredients: If using, add sweetener and/or flavoring and continue beating.
- The Perfect Peaks: Beat for another 2-3 minutes until soft peaks form.
- STOP! Don't Overbeat: Stop when cream is fluffy with a slight glossy appearance.
- Shape Your Clouds: Using a spoon or piping bag, create cloud shapes on the parchment paper.
- Add Garnishes: If desired, add any garnishes now.
- Freeze Those Fluffy Beauties: Place tray in the freezer for 1-2 hours until clouds are firm.
- Storage Prep: Once frozen, transfer to a sealed container or freezer bag for longer storage.
Notes
For the best texture, let clouds sit at room temperature for 1-2 minutes before eating. This creates the perfect melt-in-your-mouth experience.
Nutrition Information
Yield 12-15 Serving Size 1 cloudAmount Per Serving Calories 70Total Fat 7gSaturated Fat 4.5gTrans Fat 0gUnsaturated Fat 2.5gCholesterol 25mgSodium 8mgCarbohydrates 0.6gNet Carbohydrates 0.6gFiber 0gSugar 0.6gProtein 0.4g